Most SharePoint migrations fail because they’re treated like IT projects. Committees form. Timelines slip. Someone builds a migration spreadsheet that nobody finishes. Three months later, half the team is still using SharePoint and the other half has given up on the new tool.
Moving your internal documentation from SharePoint to AllyMatter doesn’t require that kind of effort. If you’re methodical about what you migrate, set up AllyMatter properly from the start, and communicate clearly with your team, you can complete the transition in under a week.
Here’s how to do it without breaking things.
Before you start (audit what you have worth keeping)
This is the step most teams skip, and it’s the reason migrations become painful. SharePoint environments accumulate years of documents: outdated policies, duplicate files, drafts that were never published, and content nobody has opened since it was uploaded.
Before you export a single file, spend a few hours auditing what you actually have.
Consider what Priya, an IT Manager at a 150-person fintech company, found when she ran a quick audit before their migration: roughly 40% of their SharePoint documents were either duplicates, outdated versions, or files no one had touched in over a year. Migrating all of it would have taken three times as long and left the new system just as cluttered as the old one. The audit took half a day. It saved the team a week.
A useful working rule: if a document hasn’t been accessed in over six months and isn’t referenced in any current workflow, it probably doesn’t need to follow you to the new platform. Some documents sit dormant until an audit requires them, so don’t make deletion decisions without looping in the relevant department heads, particularly HR, Finance, and Legal.
Use this pre-migration checklist before you export anything:
- Which documents are currently referenced in active workflows?
- Which are tied to onboarding, training, or compliance processes?
- Which have been superseded by newer versions but never removed?
- Which belong to people who have already left the company?
- Which haven’t been accessed in over six months?
- Which are duplicates of documents living elsewhere?
A rough inventory at this stage will save you significant time later. You don’t need to be exhaustive. Even a 30-minute walkthrough of your SharePoint structure with someone from each team will surface the documents worth prioritising.
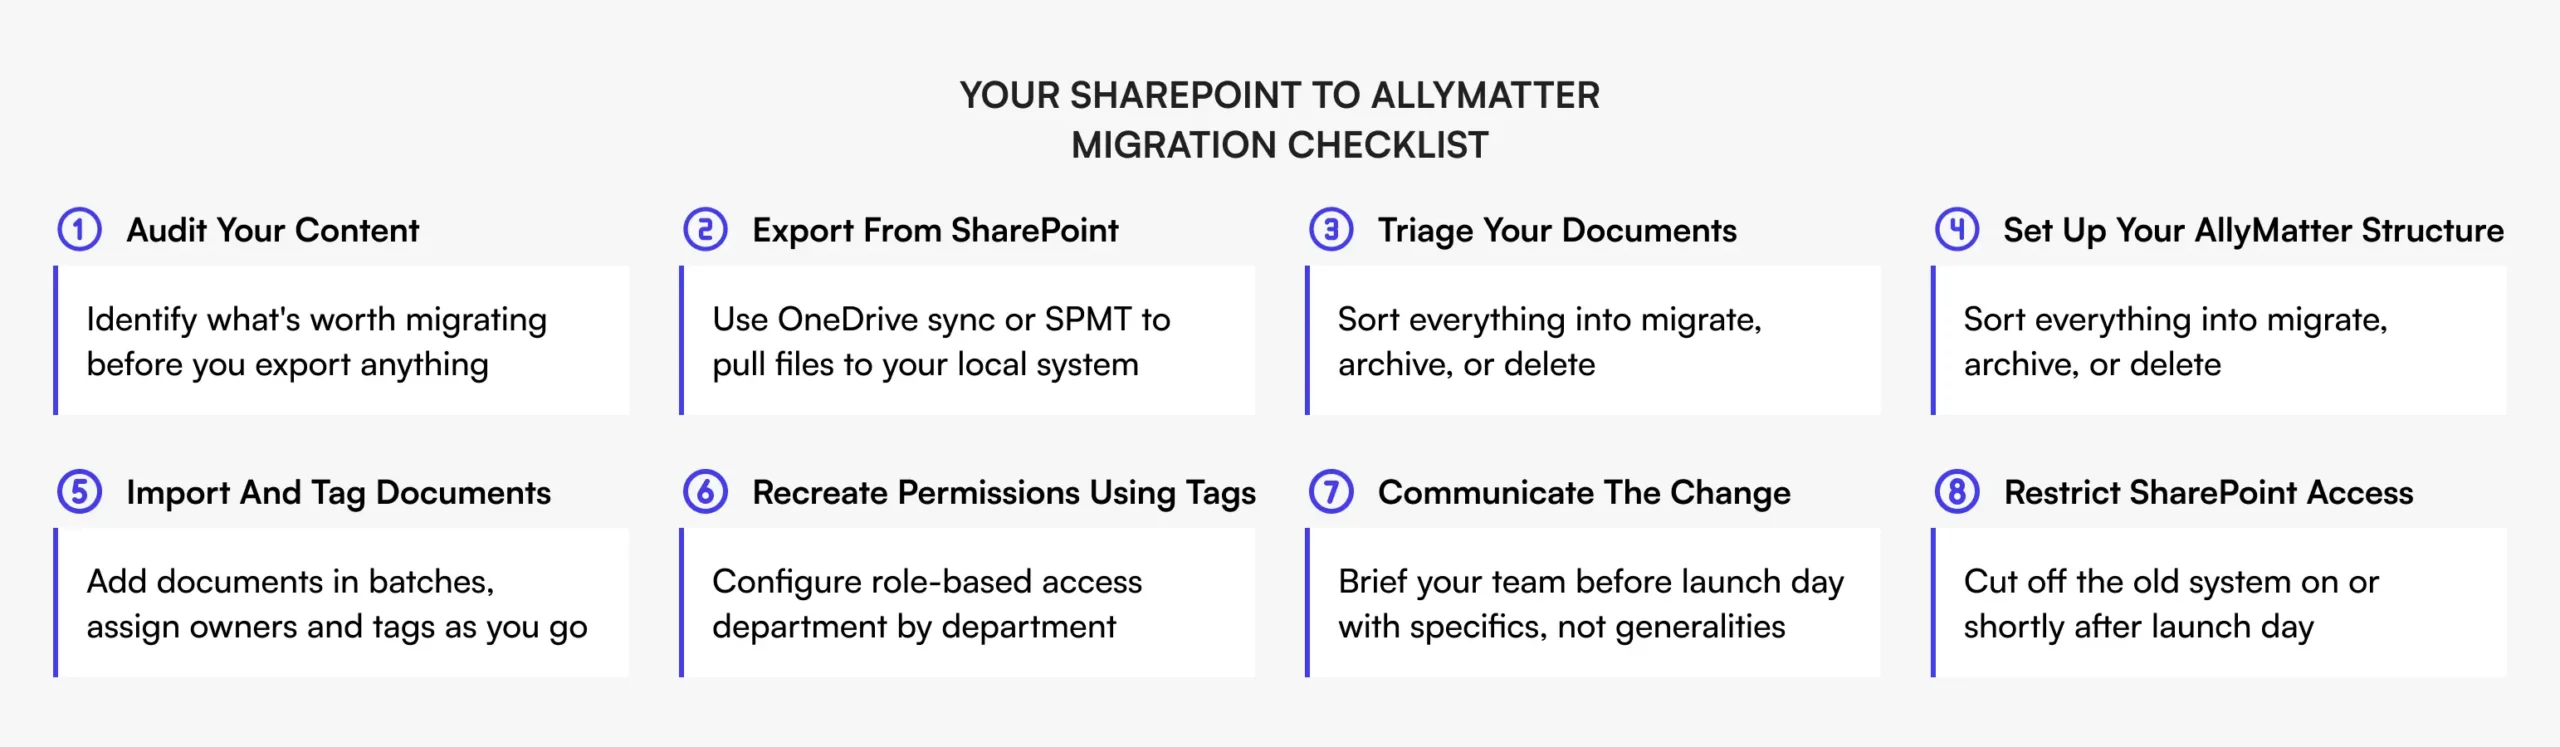
Step 1: Export your SharePoint content
SharePoint doesn’t offer a single one-click export for everything, so you’ll need to work through it methodically. For most growing companies in the 50-500 employee range, the simplest approach is to use the OneDrive sync app to sync your SharePoint document libraries to your local file system, then work from there.
Before you do this, there are a couple of things worth knowing.
SharePoint’s sync function does not capture permissions, metadata, or version history. You’ll be moving file content only. If you need a record of version history for specific documents, compliance-sensitive policies for example, export those separately or document the version timeline before you migrate.
SharePoint Online enforces a 400-character limit on the full decoded file path, which includes your site name, document library, folder structure, and file name combined. Deep folder hierarchies eat into that limit faster than most people expect. Files with special characters such as * : < > ? / \ | in their names will also fail to sync entirely. If your SharePoint environment has been in use for several years, audit for both long paths and invalid characters before attempting the export. Rename or restructure anything that won’t clear those limits.
For companies with more complex SharePoint environments, multiple site collections, nested subsites, or heavily customised metadata, Microsoft’s SharePoint Migration Tool (SPMT) offers more control. For most internal knowledge bases moving to a dedicated documentation platform, though, the sync approach is sufficient.
Step 2: Decide what to migrate vs. archive
Once you have your files locally, you have a decision to make for each document category. Think of it in three buckets.
Migrate: Documents that are actively used and need to live in AllyMatter from day one. This includes current HR policies, operational SOPs, onboarding materials, compliance documents, and any knowledge base articles that team members reference regularly.
Archive: Documents that need to be retained for legal or compliance reasons but aren’t in active circulation. These can be stored in a separate archive folder within AllyMatter or kept in a separate storage location entirely. Don’t clutter your new knowledge base with them.
Delete: Duplicate files, outdated drafts, and documents with no current relevance. Get sign-off from the relevant department leads before deleting anything that could have compliance implications.
This triage step is what determines whether your new AllyMatter environment starts clean or replicates the same chaos you were trying to leave behind. The effort here pays off quickly.
Step 3: Set up your AllyMatter structure
Build the structure in AllyMatter before you import a single document. Trying to organise content after importing it is significantly harder.
AllyMatter uses a folder-based structure combined with a tag system to organise and filter documents. You can create folders and subfolders by department, function, or whatever taxonomy makes sense for how your teams actually work. Tags can be assigned to both documents and users to support filtering and access management.
For example, HR could have subfolders for Policies, Onboarding, and Compliance. Finance for Expense guidelines and Vendor processes. Operations for SOPs and Process documentation.
Start with this or a similar two-level structure. Resist the temptation to over-engineer it at the start. A structure your team understands will always outperform a five-level taxonomy that nobody uses consistently.
While you’re setting up the structure, configure your user roles too. AllyMatter has clearly defined roles including
. Map your team to these roles before documents start going in. Knowing who can edit what and who needs to approve what is easier to manage from the beginning than to retrofit later.
Step 4: Import and organise
With your structure in place, import your documents into the relevant folders. Start with your highest-priority documents, the ones your team will reach for first, so that AllyMatter is immediately useful from day one even if the full migration isn’t complete.
As you import, take a few minutes per document to check that the title is clear and follows a consistent naming convention, add relevant tags so documents are searchable and filterable, verify that the content is current, and assign document ownership so it’s clear who is responsible for keeping it updated.
Don’t import everything at once and then try to organise it. That approach recreates the same disorganised environment you’re leaving. Import in batches by department or content type, and get each section into reasonable shape before moving to the next.
If you’re planning to use AllyMatter’s approval workflow features, this is also the point to decide which documents require a formal approval process before publishing. Compliance-critical documents such as HR policies, financial procedures, and regulatory SOPs are good candidates for an approval flow, particularly if they need sign-off from Legal or a department head before going live.
Step 5: Recreate permissions using AllyMatter tags
In SharePoint, permissions are typically managed at the site or library level and can become complicated quickly, especially in environments where the permission structure has evolved organically over several years. Moving to AllyMatter is an opportunity to simplify this.
AllyMatter handles access control through a combination of user roles and tags. Tags can be assigned to both users and documents, which allows you to manage document access at a more granular level than broad site-wide permissions. When deciding which documents specific users or groups should access, you can use tags assigned to both documents and users to control visibility and filtering.
Work department by department when recreating permissions rather than trying to map your entire SharePoint permission structure all at once. Identify the documents with restricted access requirements, then configure the appropriate tags for both the documents and the relevant user groups. For most growing companies, this model is considerably simpler to maintain as the team grows or changes than SharePoint’s nested permission hierarchies.
Enterprise Admins can manage all user tags from the user management interface, which makes ongoing access administration more straightforward.
Step 6: Communicate the change to your team
The technical migration is only half the work. Making sure your team actually uses the new system is the other half.
Teams default to old habits, especially when the new system hasn’t been explained clearly or when the old system is still accessible as a fallback. This is the most common reason knowledge base migrations don’t stick, and it has nothing to do with the tool itself.
Here’s what the transition typically looks like before and after a well-managed migration:
Before: Team members search SharePoint, can’t find what they need, ask a colleague, get pointed to an email thread from eight months ago, and eventually find a version of the document they’re not sure is current.
After: Team members open AllyMatter, search or browse by department, find the document with a clear version number and owner, and know it’s been approved and acknowledged by the relevant teams.
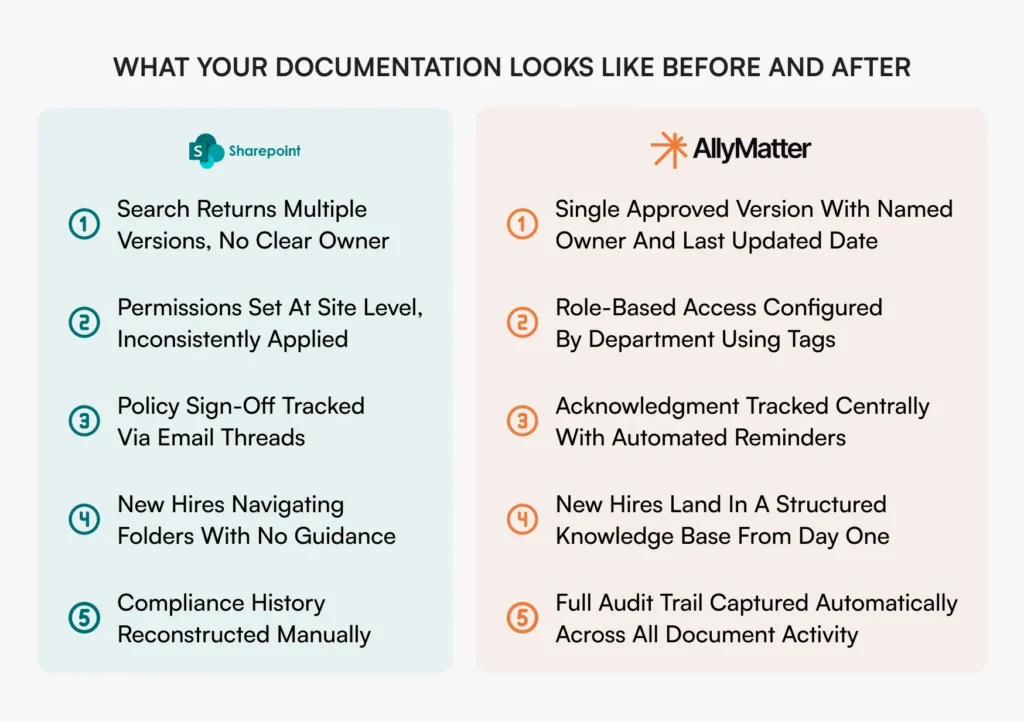
That shift doesn’t happen automatically. It requires a few deliberate steps.
Send a straightforward message before launch explaining what’s changing, why you made the switch, and where to find the documents they use most. Be specific and practical rather than promotional.
Run a short walkthrough session for each department, 30 minutes is typically enough, covering how to find documents, how to acknowledge policies, and who to contact if they have questions. If your team is distributed, record it.
Restrict access to your SharePoint environment on or shortly after the day you launch AllyMatter. Running both systems in parallel for extended periods gives people an easy reason to keep using the old one.
Use AllyMatter’s acknowledgment tracking to confirm that team members have read and acknowledged critical policies after the migration. This is particularly useful for HR, Legal, and Finance documents where you need a record of who has seen what. Automated reminders can be configured for team members who haven’t yet acknowledged a document.
Migration timeline: Realistic estimates
Spread across a few days, this is a realistic four to five working day project. The range depends heavily on how organised your SharePoint environment is and how much triage you need to do upfront. Companies with well-maintained SharePoint environments will land toward the lower end. Those with several years of accumulated files across multiple sites will need more time.
Common mistakes to avoid
Migrating everything. The goal isn’t to replicate SharePoint in a new tool. It’s to build a cleaner, more functional knowledge base. Only migrate what your team actually needs.
Setting up permissions after the migration. Dealing with access control after documents are already in the system is far more time-consuming than configuring it upfront.
Running both systems simultaneously for too long. A brief parallel period is reasonable for catching gaps. Anything longer and you’ll find yourself managing two knowledge bases indefinitely.
Skipping document ownership assignment. Every document in your new system should have a named owner. Without this, you’ll be back to the same problem of outdated content with no clear accountability.
Treating it as a one-person IT project. Successful migrations involve brief input from each department head on what matters most to their team. You don’t need them involved in the technical work, just in the content decisions.
Ready to get started? Start your 30-day free trial.
FAQs
Does AllyMatter have a built-in import tool for SharePoint?
You don’t need to handle the migration on your own. AllyMatter’s team can manage the import for you. Simply send over your exported SharePoint files and the team will migrate them into your AllyMatter account. To get started, contact the AllyMatter team.
What happens to version history when I migrate from SharePoint?
SharePoint’s version history does not transfer during a standard file export. If version history matters for specific documents, particularly compliance or legal documents, export a version record or PDF summary before migrating. Going forward, AllyMatter’s version control will capture all changes made within the platform, including who made each change and when.
How long does it realistically take to migrate from SharePoint to AllyMatter?
For a company with 50-200 employees and a reasonably organised SharePoint environment, the full migration typically takes between 15 and 29 hours of active work, which is achievable in four to five working days and up to two weeks in some cases. The biggest time variable is the content audit and how much triage your SharePoint environment requires before you start importing.
Do I need to recreate all my SharePoint permissions in AllyMatter?
You don’t need to replicate SharePoint’s permission structure exactly, and in most cases you shouldn’t try to. AllyMatter’s role-based access combined with tag assignment gives you a straightforward way to manage who sees what. Use the migration as an opportunity to rethink access from scratch: which documents are genuinely sensitive, which teams need access to what, and how that should be structured going forward.
Further reading:
- Why SharePoint fails as an internal knowledge base
- AllyMatter knowledge base features
- Document access control with tags

Founder of AllyMatter I’m Sid Varma, founder of AllyMatter, an operations-first knowledge base for growing companies. Before AllyMatter, I co-founded Syren Cloud and helped scale it into a 300-person organization across two countries, leading marketing, operations, and HR. We moved fast, served demanding customers, and learned the hard way that internal knowledge systems built for help docs or IT don’t solve day-to-day operations. AllyMatter is my answer—tools that turn tribal knowledge into trusted, searchable processes. This blog shares the playbooks, checklists, and lessons I wish I’d had while scaling.